
Order by phone 0121 433 3389
Order by phone 0121 433 3389
All Carpets include FREE Fitting & FREE Delivery : Prices start from £3.99 m2
Vinyl flooring has become a genuinely effective option with its timeless appeal and remarkable versatility. Its significance lies in its transformative power and effortless enhancing any space it graces.
Whether you seek a sleek, modern look or a rustic, vintage charm, vinyl flooring effortlessly adapts to your style, making it an indispensable choice for homeowners, decorators, and designers alike.
Beyond its aesthetic prowess, vinyl flooring triumphs in functionality as well. With its exceptional durability, it withstands the test of time, enduring heavy foot traffic, spills, and daily wear and tear with ease.
Its waterproof nature makes it ideal for areas with excessive moisture, like kitchens and bathrooms. Moreover, vinyl flooring’s remarkable ease of installation and maintenance elevates its significance further, allowing for a hassle-free experience while delivering exceptional results.
From its unmatched blend of style and strength to its practicality and simplicity, vinyl flooring symbolises the perfect fusion of beauty and functionality, enhancing its significance as an undeniable cornerstone in the world of interior design.
Vinyl flooring comes in several types, each offering unique characteristics and benefits. Let’s look at some of the common types:
Luxury vinyl plank mimics the appearance of hardwood flooring, offering a realistic wood grain texture and a wide range of colours and finishes. It is durable, water-resistant, and easy to maintain, making it suitable for high-traffic areas.
Luxury vinyl tile resembles natural stone or ceramic tile, providing a realistic and elegant look. It is available in various shapes, sizes, and patterns, allowing creative designs. LVT is durable, comfortable underfoot, and resistant to moisture and stains.
Sheet vinyl comes in large rolls and is typically installed in one piece, making it an excellent choice for seamless flooring. It offers a broad range of patterns and colours, including designs that resemble hardwood, tile, or stone. Sheet vinyl is cost-effective, durable, and resistant to water and scratches.
Rigid core vinyl is a newer type of vinyl flooring that combines stability, durability, and ease of installation. It features a rigid core layer that provides dimensional stability and can be installed directly over existing floors. Rigid core vinyl is an excellent choice for both residential and commercial settings due to its waterproof nature, scratch-resistant properties, and durability.
Vinyl composite tile is commonly used in commercial settings due to its durability and affordability. It consists of a mixture of vinyl, limestone, and other materials. VCT is available in various colours and patterns and requires regular maintenance and occasional waxing to preserve its appearance.
Discussed above are just a few types of vinyl flooring available in the market. Each type has its advantages and is designed to meet specific needs, allowing homeowners and designers to choose the most suitable option for their space.
Feel Free To Get In Touch With Us To Get A Quote Over Different Laminate Flooring Service
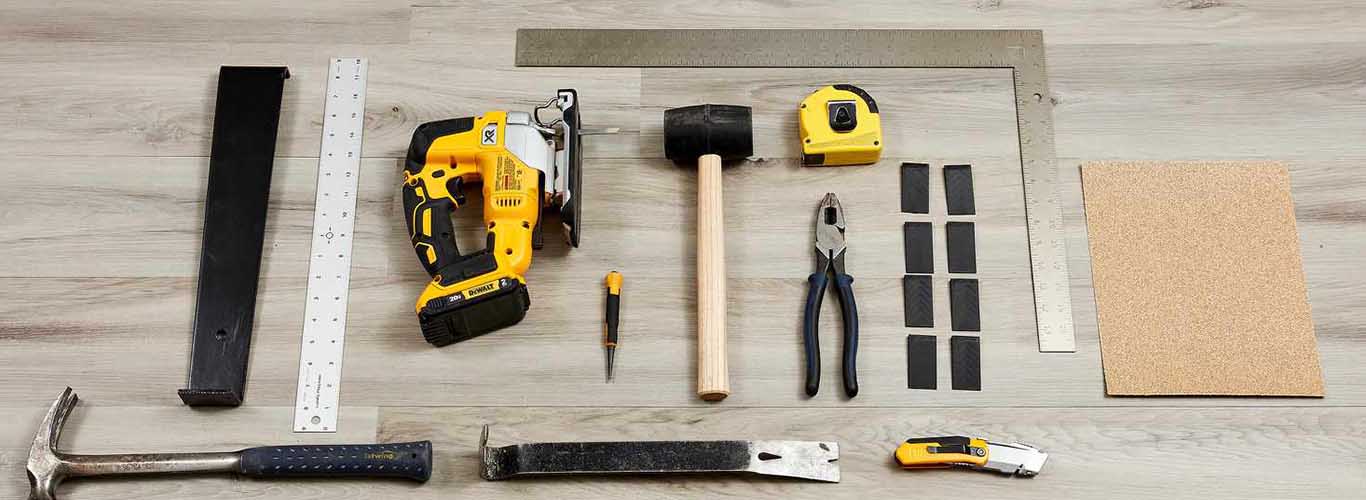
Installing vinyl flooring requires some basic tools and materials. Here are the essential tools you will need to install vinyl floors:
Besides the aforementioned tools, acquiring additional materials like underlayment, adhesive, and transition strips may be necessary, depending on the specific type of vinyl flooring being installed and the unique demands of your installation project.
Reading the manufacturer’s instructions carefully and gathering all the necessary tools and materials before starting your vinyl flooring installation would be beneficial.
Installing vinyl flooring requires careful planning and attention to detail. Here are comprehensive guidelines to help you install vinyl flooring:
Prepare the Subfloor: Ensure the subfloor is clean, smooth, and free from debris or imperfections. Repair any damages and make sure the subfloor is level.
Acclimate the Vinyl: Allow the vinyl planks or tiles to acclimate to the room’s temperature and humidity according to the manufacturer’s instructions. This helps prevent expansion or contraction after installation.
Measure and Plan: Measure the room’s dimensions and calculate the vinyl flooring needed. Plan the layout, considering any obstacles, doorways, or irregularities in the room.
Remove Baseboards: Use a pry bar to remove baseboards or shoe moulding along the walls. This allows for a neater installation, enabling the vinyl to fit snugly against the walls.
Install Underlayment: Depending on the type of vinyl flooring, you may need to install an underlayment. Follow the manufacturer’s instructions to lay the underlayment evenly across the subfloor.
Start Installation: Begin installation in a corner of the room, working from left to right. Lay the first row of vinyl planks or tiles, leaving a small gap (typically 1/8 inch) between the flooring and the walls for expansion.
Cut and Trim: Use a utility knife and straight edge to cut the vinyl planks or tiles as needed to fit around obstacles, corners, and doorways. Ensure precise measurements and smooth cuts for a professional finish.
Apply Adhesive: If using adhesive, follow the manufacturer’s recommendations and apply it with a notched trowel to the subfloor. Work in manageable chunks to prevent the adhesive from drying out.
Install Remaining Rows: Continue installing the vinyl planks or tiles row by row, ensuring they are snugly fitted together. Use a floor roller to press the flooring firmly onto the subfloor, eliminating air pockets and ensuring proper adhesion.
Install Transition Strips: Install transition strips where the vinyl flooring meets different surfaces or thresholds, ensuring a seamless and finished appearance.
Replace Baseboards: Once the vinyl flooring is installed, reinstall the baseboards or shoe moulding to cover the expansion gap and provide a polished look.
Clean and Maintain: Clean the vinyl flooring according to the manufacturer’s recommendations to maintain its appearance and longevity. Avoid excessive moisture and use suitable cleaning products.
Always follow the specific installation instructions provided by the vinyl flooring manufacturer, as different products may slightly vary installation methods. Take your time, work carefully, and enjoy the process of transforming your space with beautiful vinyl flooring.
JJ’s Flooring is the fastest growing carpet & vinyl flooring retail brand with over 40 years of experience in serving the public and trade customers with quality at affordable prices.
Quick Links
Categories
Address:
1428 Pershore Road Stirchley Birmingham B30 2PH
Mobile:
0121 433 3389
Email:
contact@jjsonline.co.uk
Copyright © 2026 | JJ's Flooring | All rights Reserved.
Order in Confidence with Secure Online Payments
We accept all major credit & debit cards.
